Getting to the Report Builder
- From the Homepage, navigate to the Reporting tab in the top navigation bar.
- Click the Report Builder button in the top right.
- Select the tenant in the top left corner of the report builder.
- Choose a date range using the date picker. Presets include Last 30 days, Last 3 months, Last 6 months, Month to date, and more.
The report preview generates in real-time as you change the tenant or date range.
Report Contents
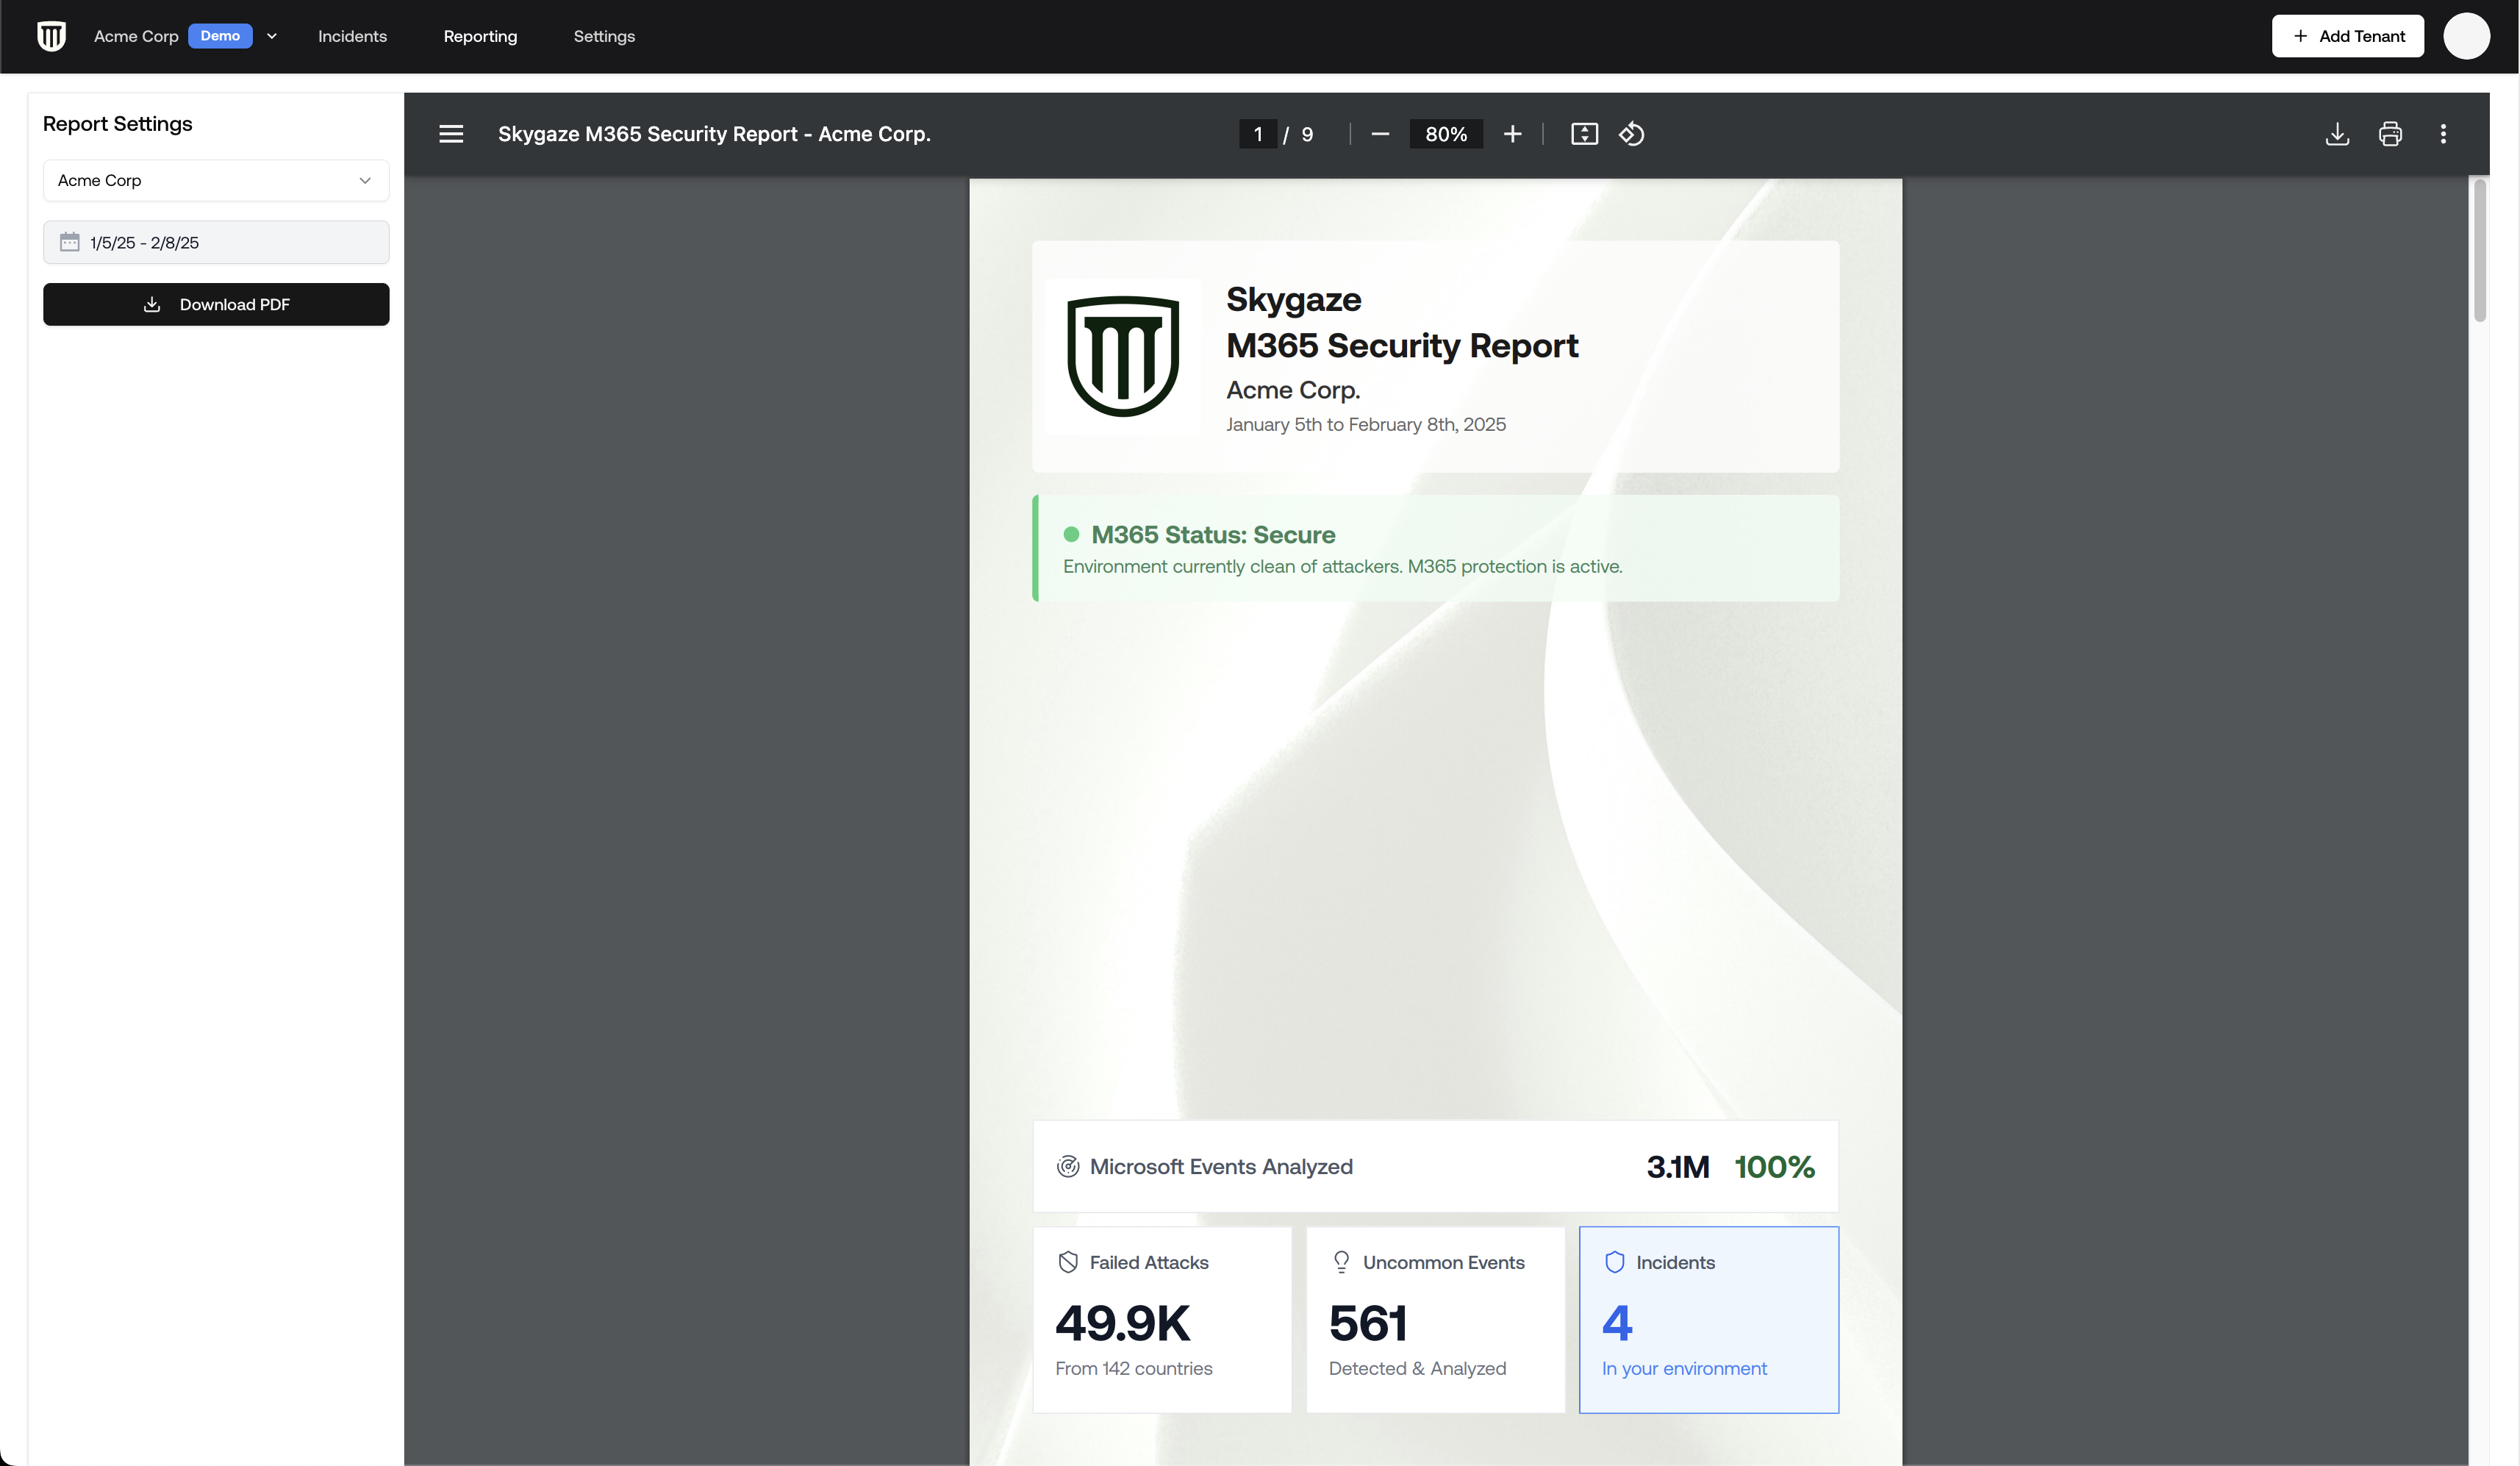
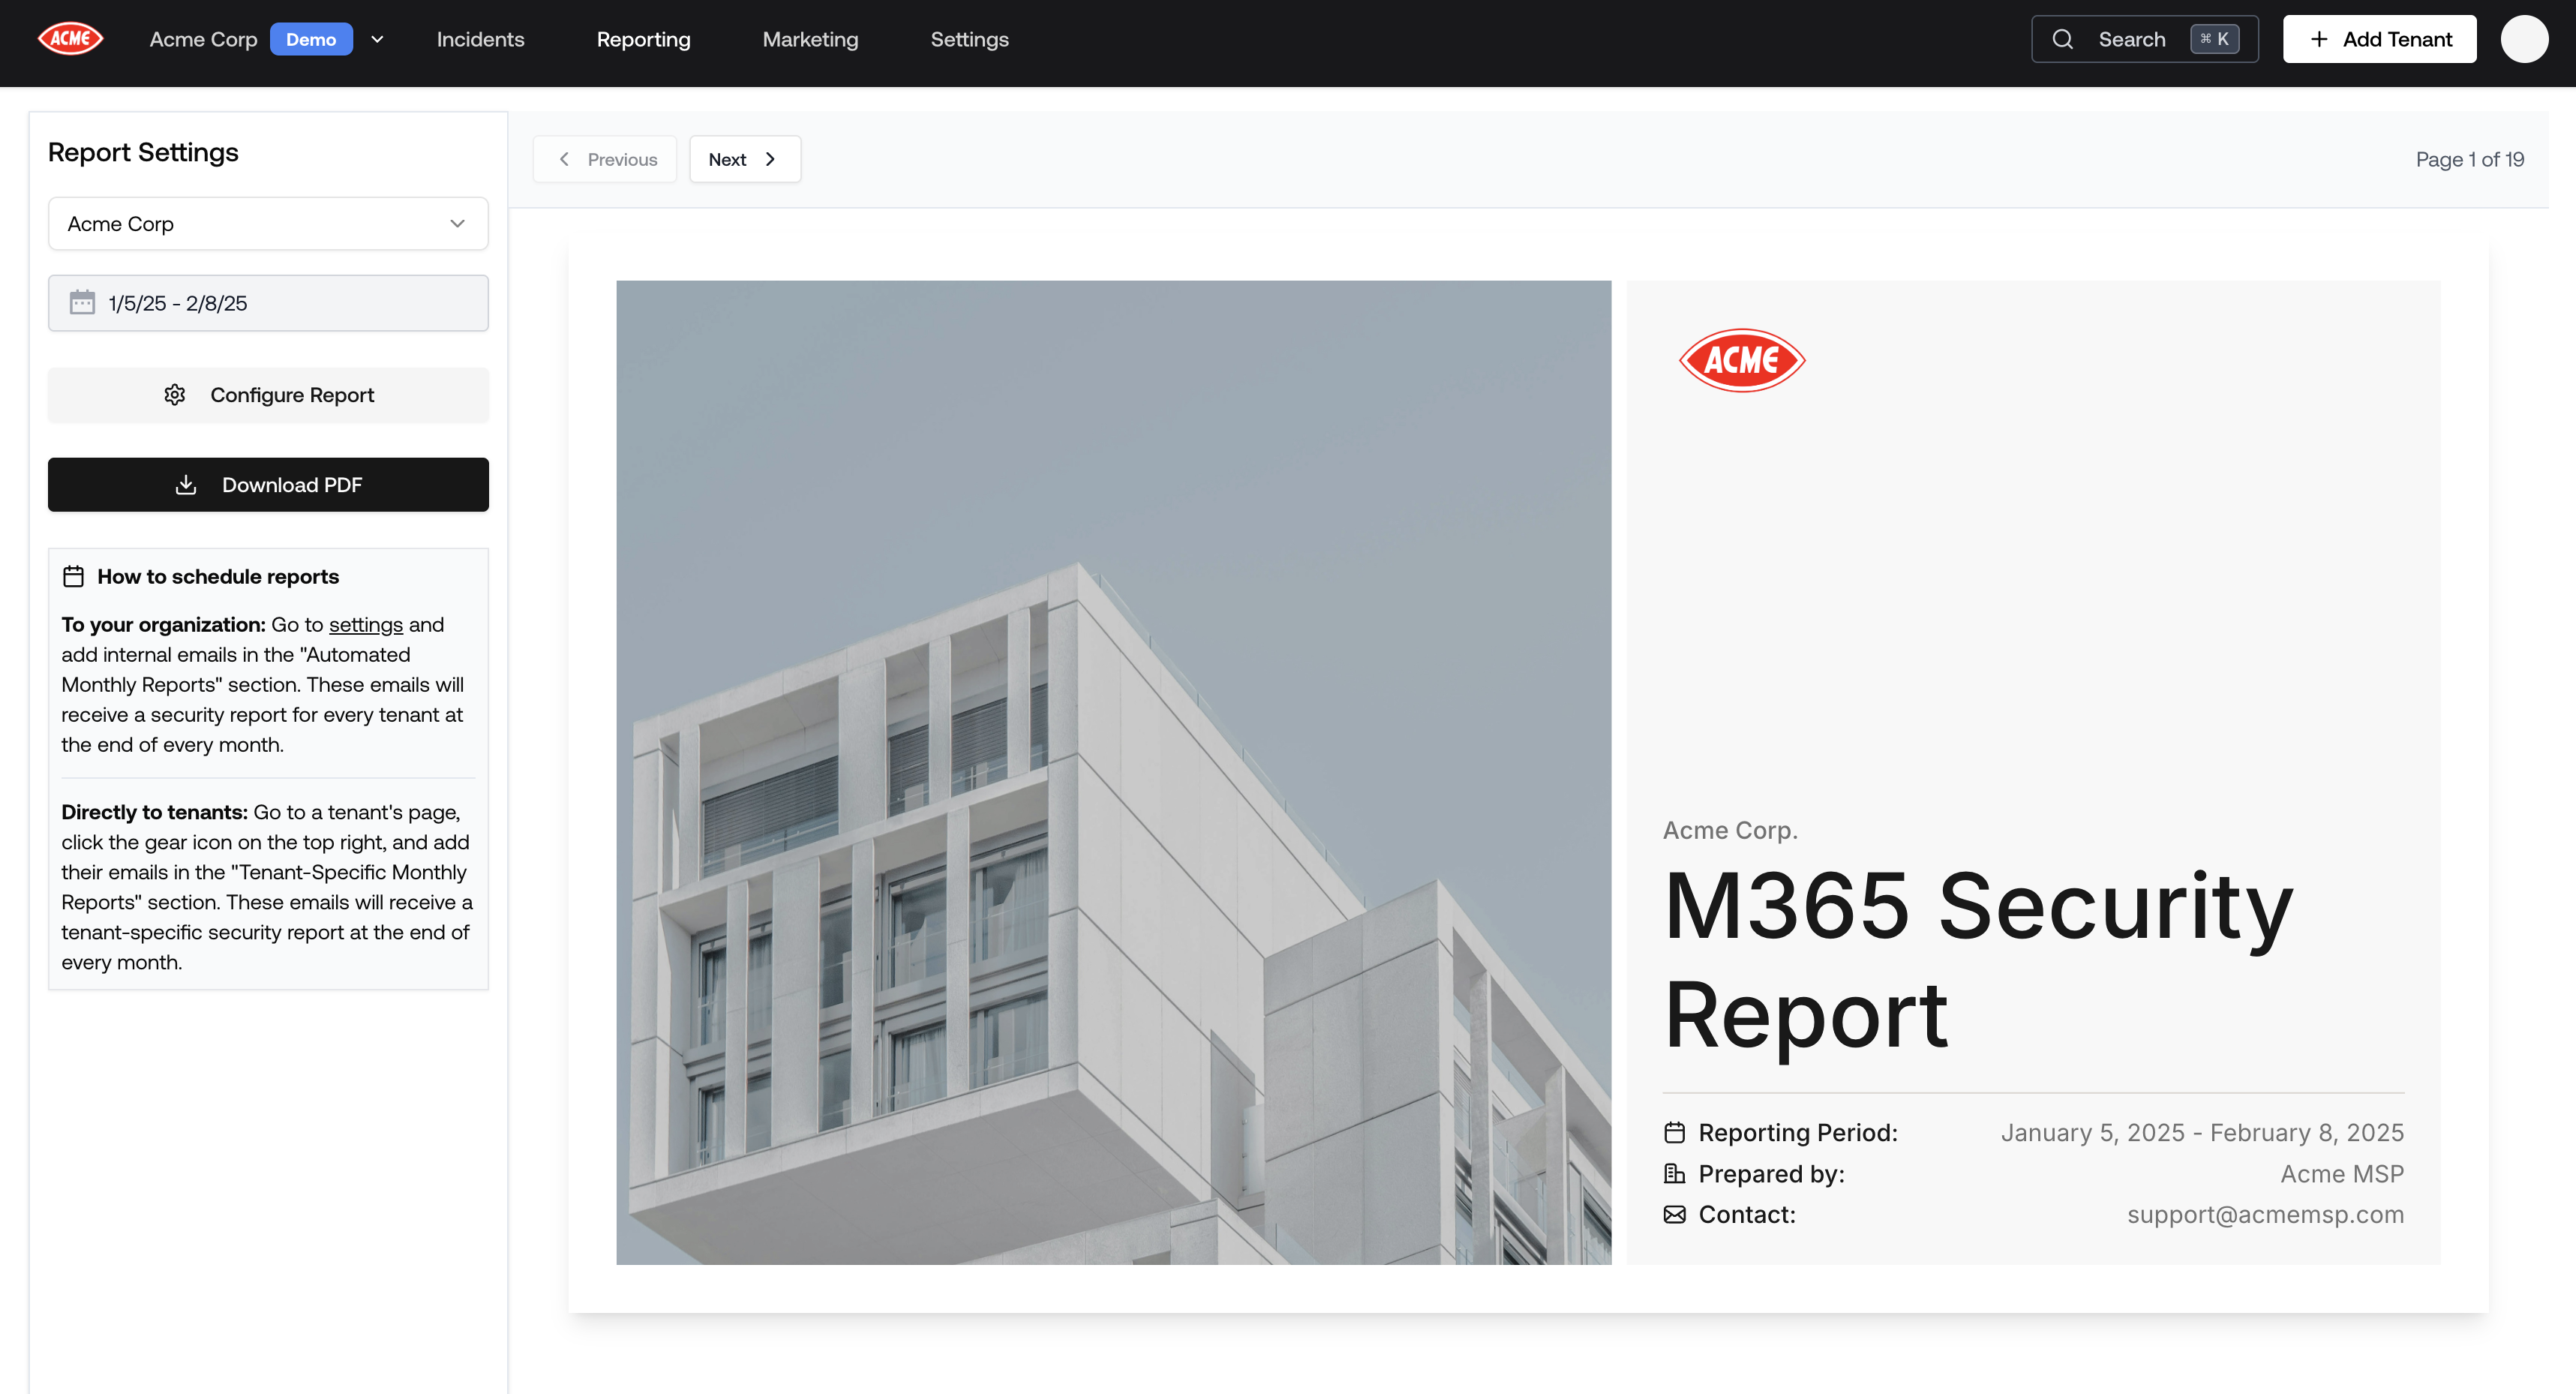
The PDF includes your organization’s branding (logo, name, contact email, and currency) along with:
- Executive Summary: A high-level overview of the tenant’s security posture for the selected period.
- Summary Metrics: Number of analyzed events, identified failed attacks, involved countries, uncommon activities, and detected incidents.
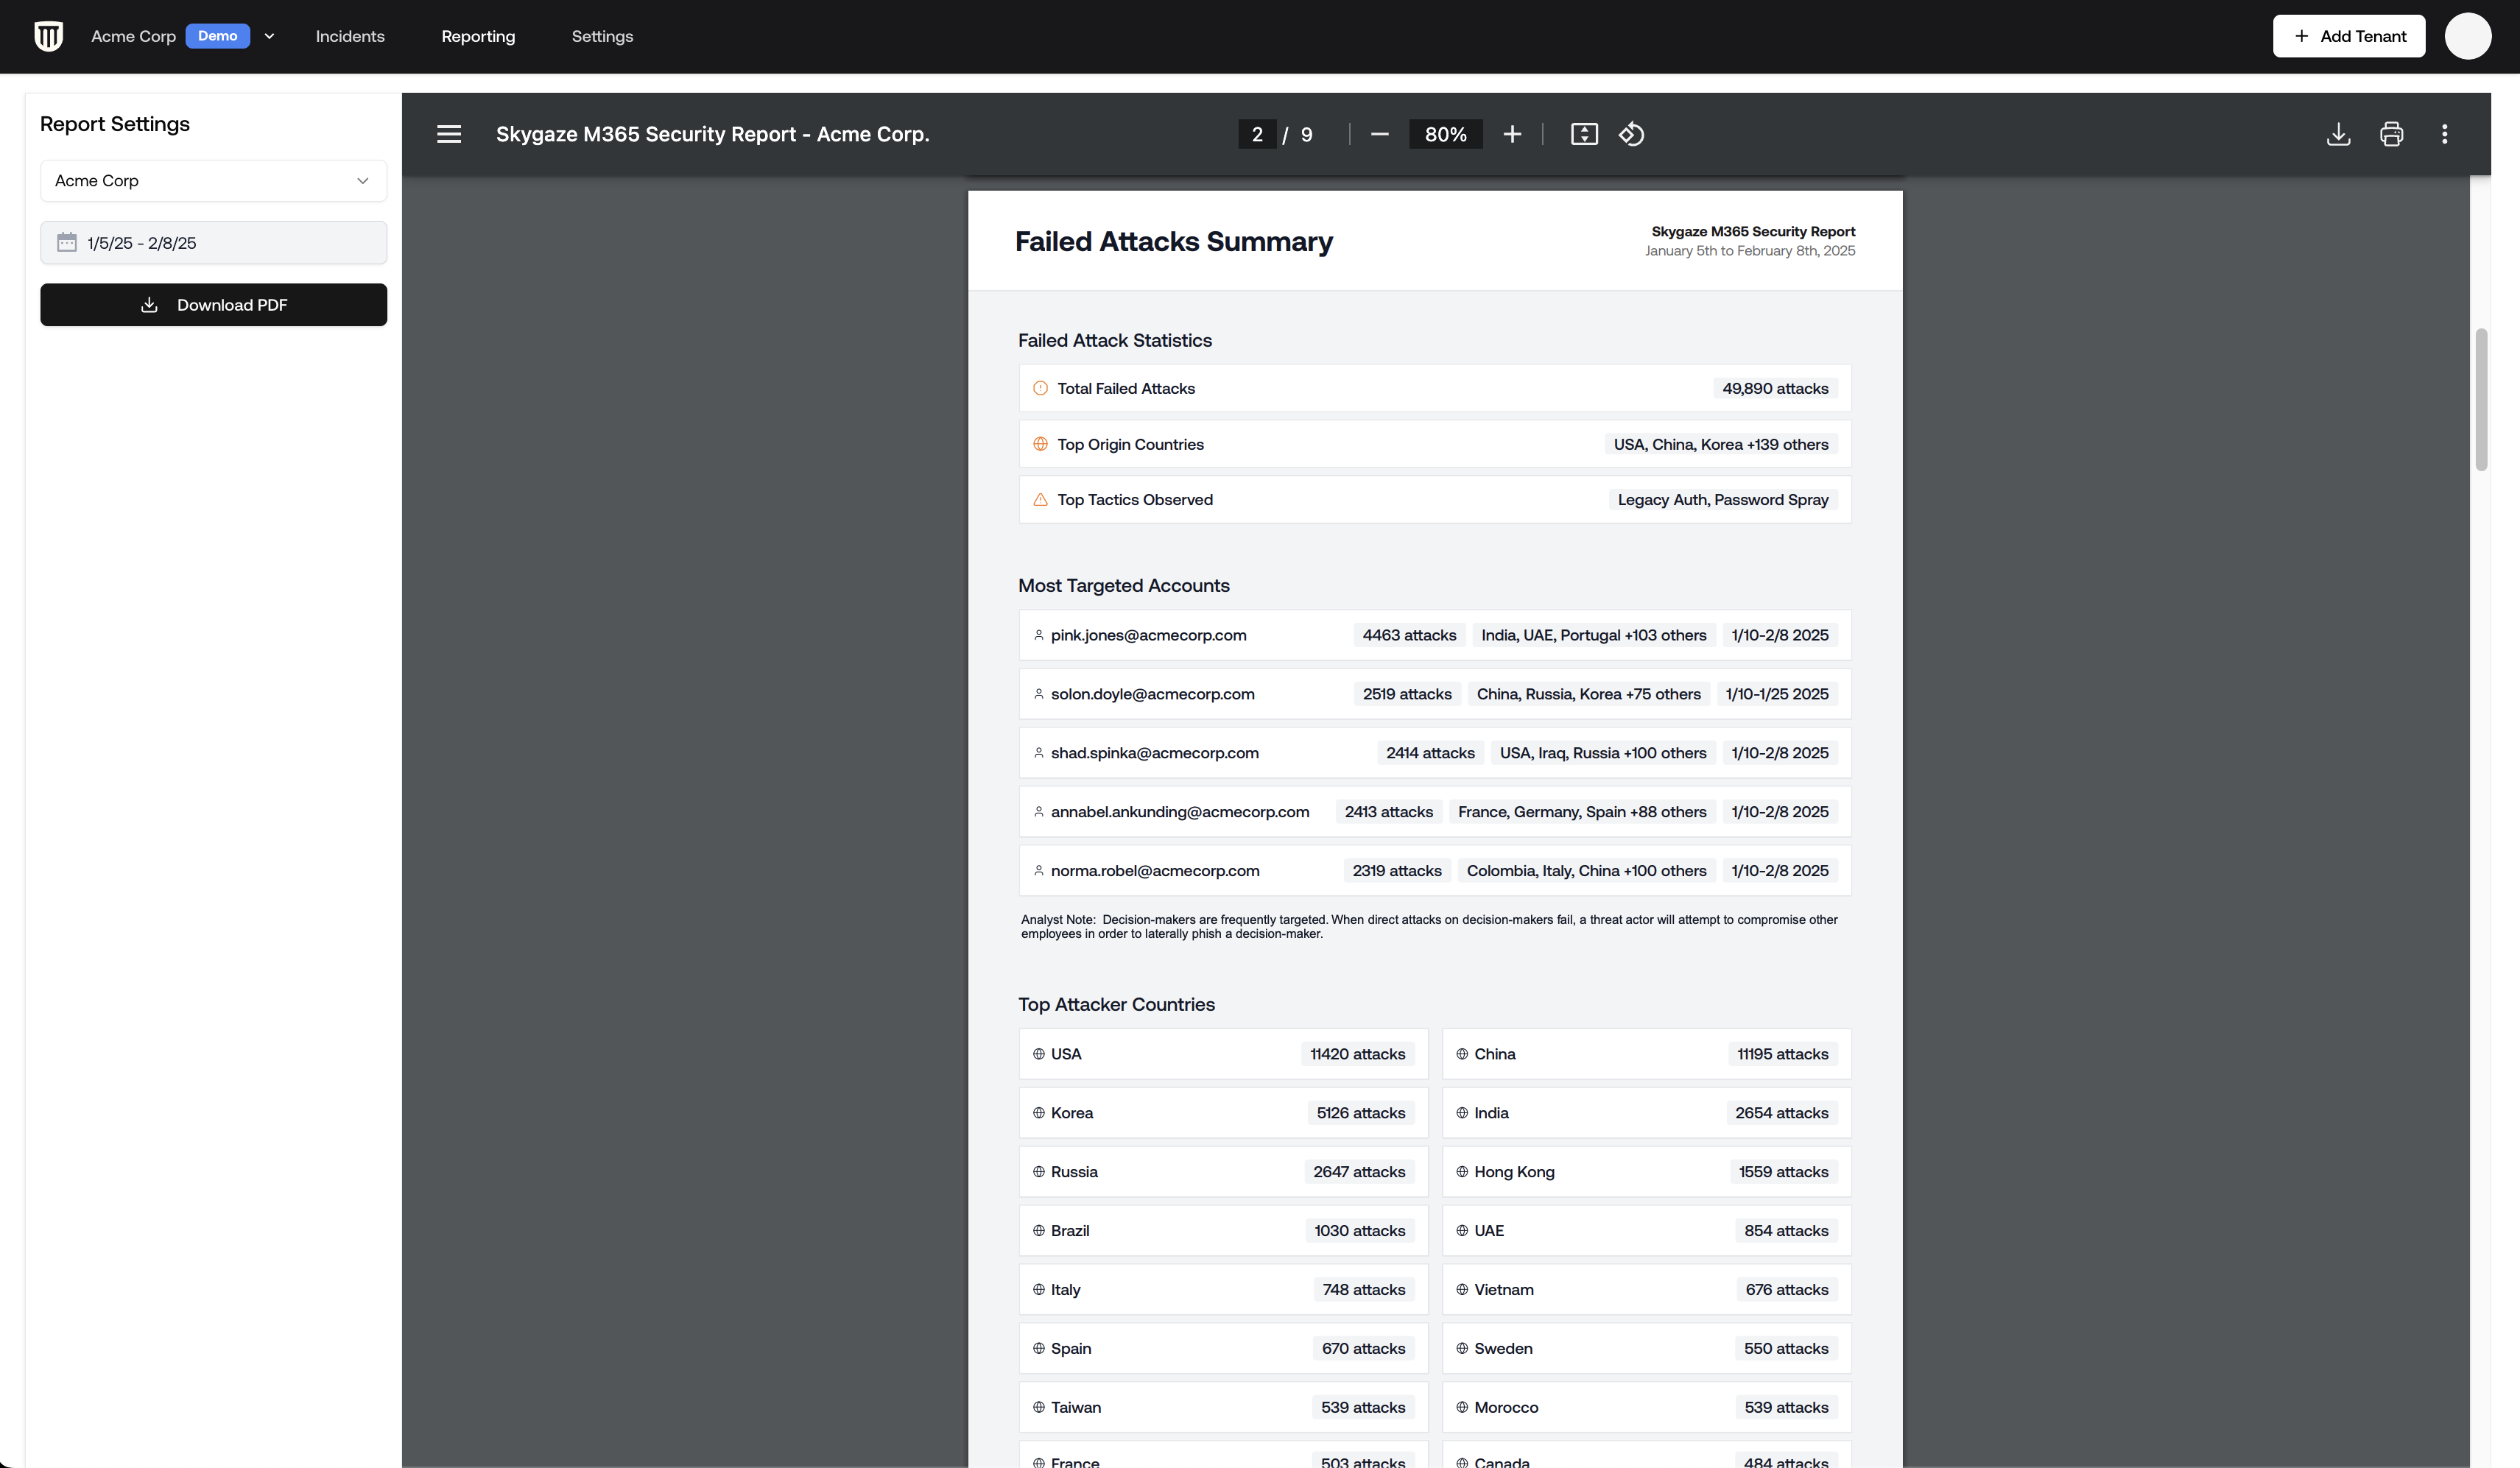
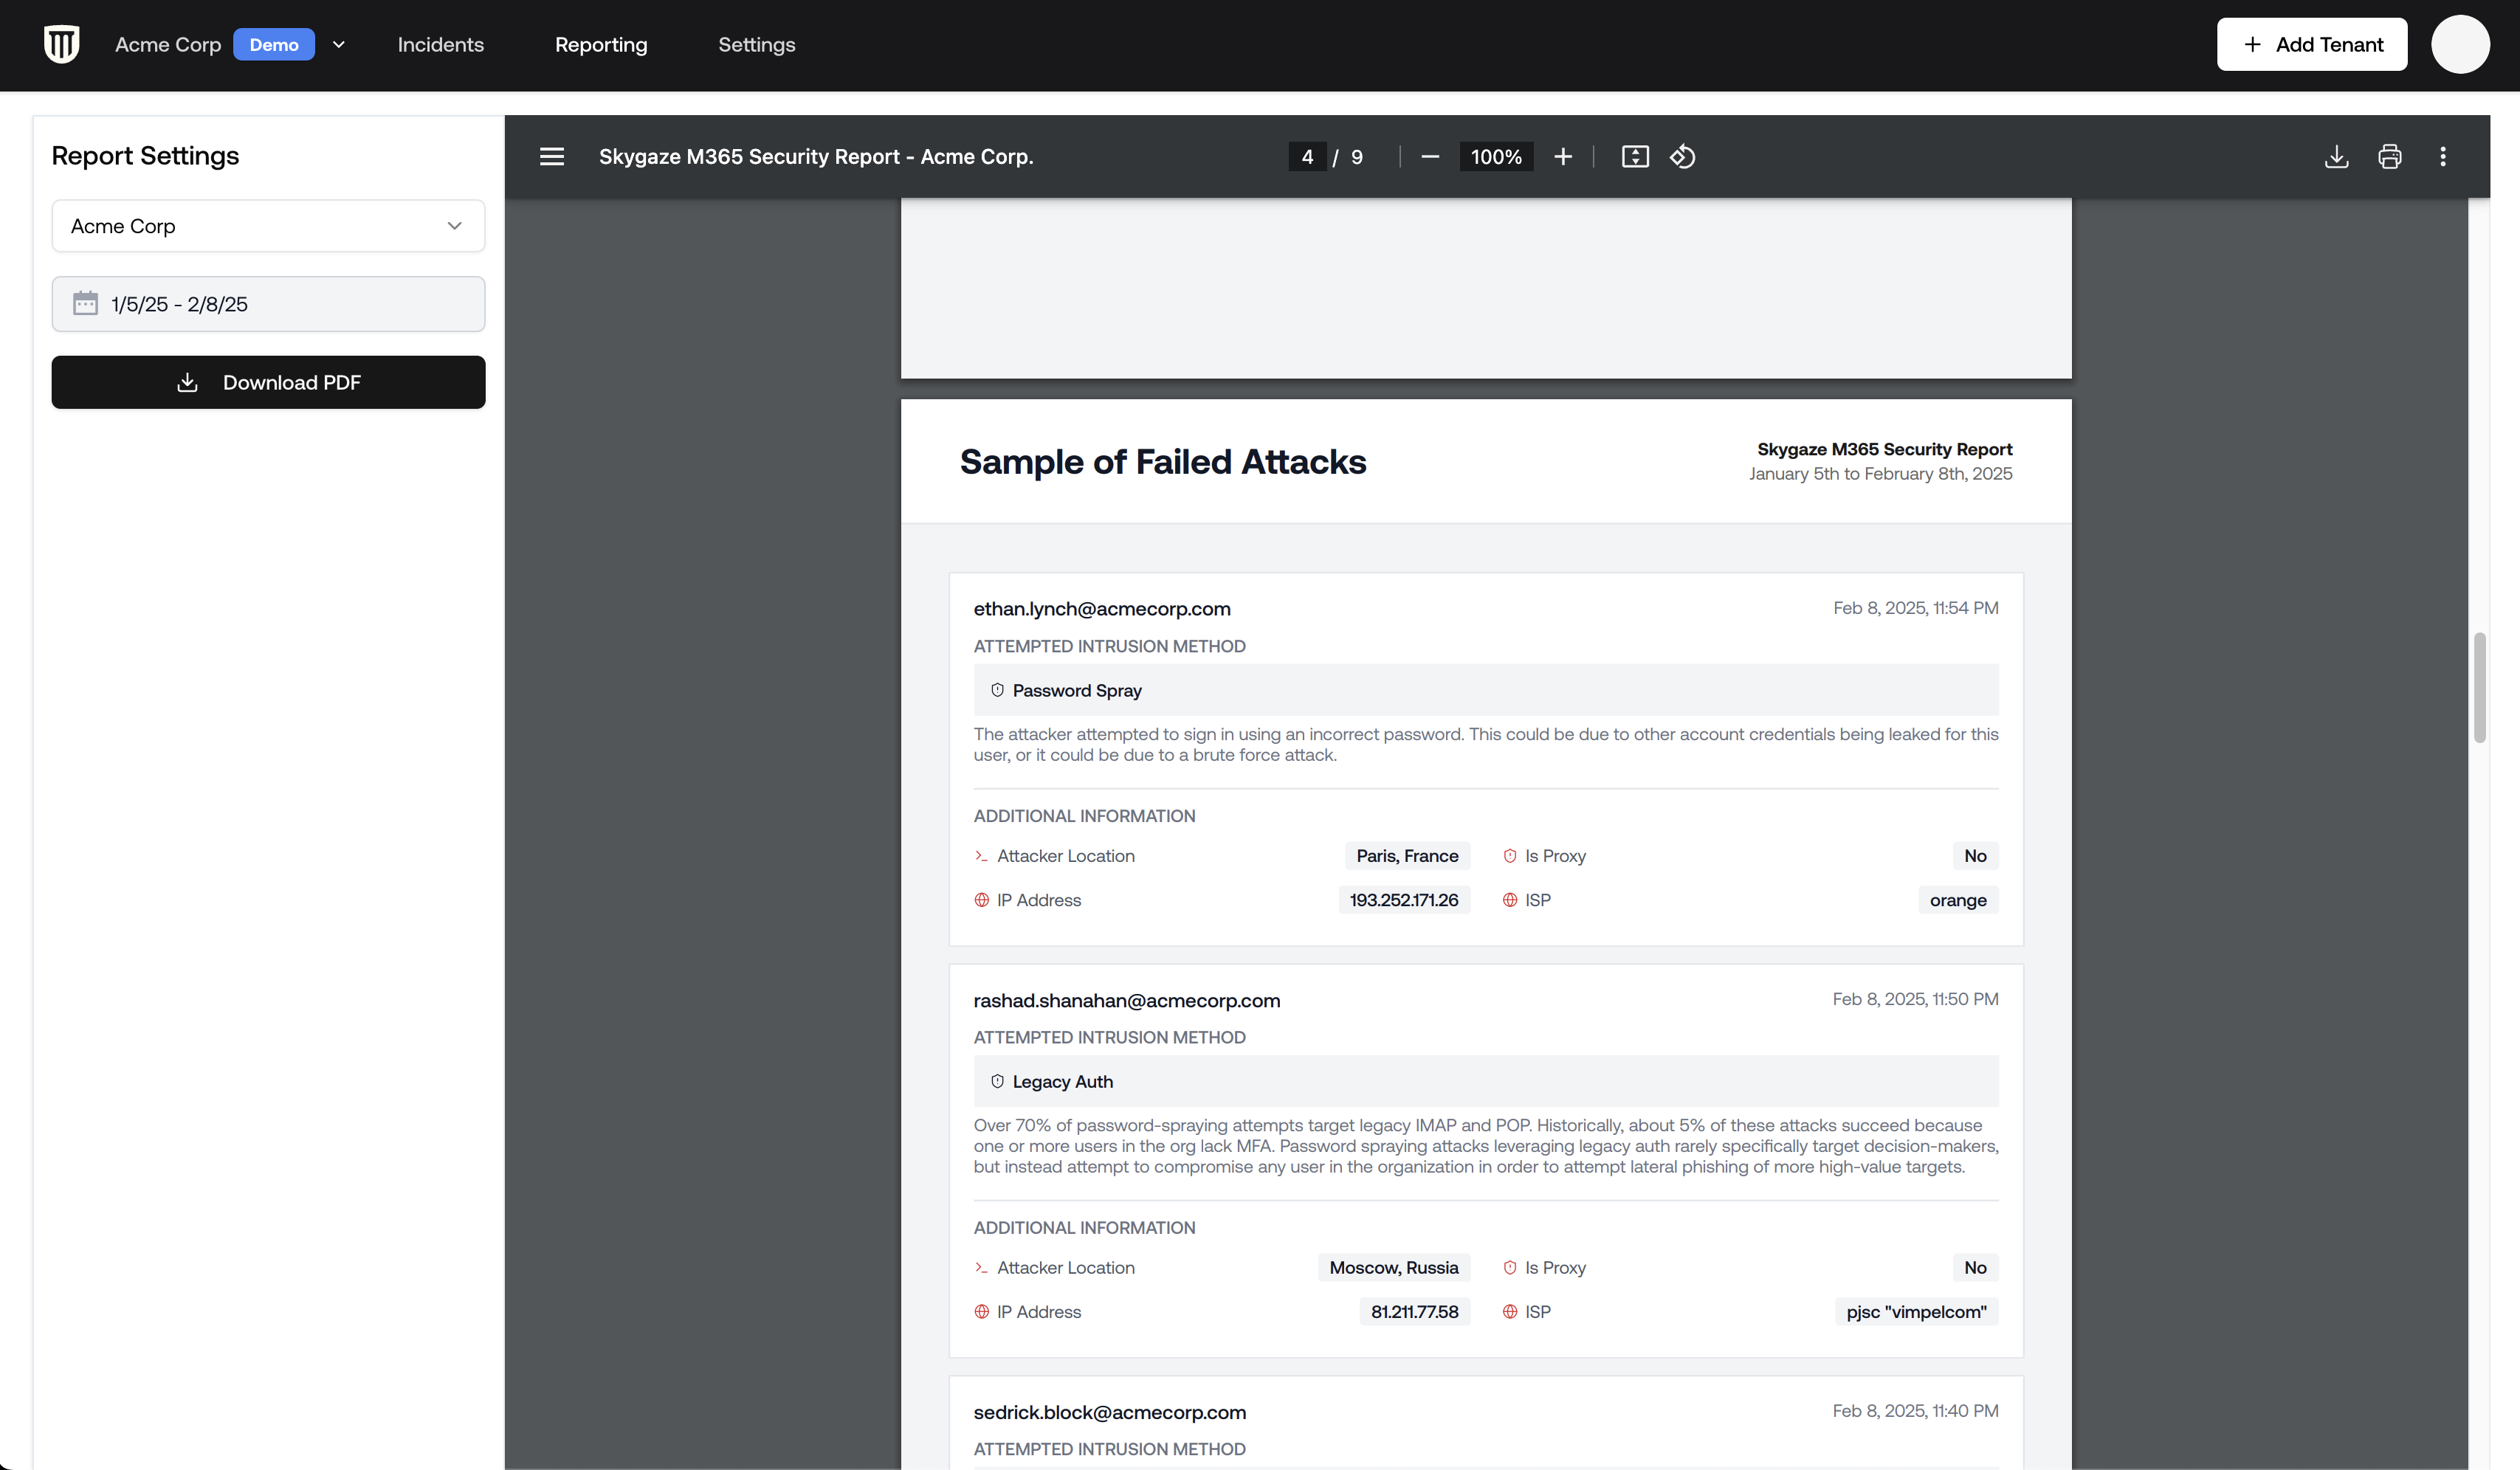
- Failed Attacks: Specifics on targeted accounts, countries involved, and detailed insights into each unsuccessful intrusion attempt.
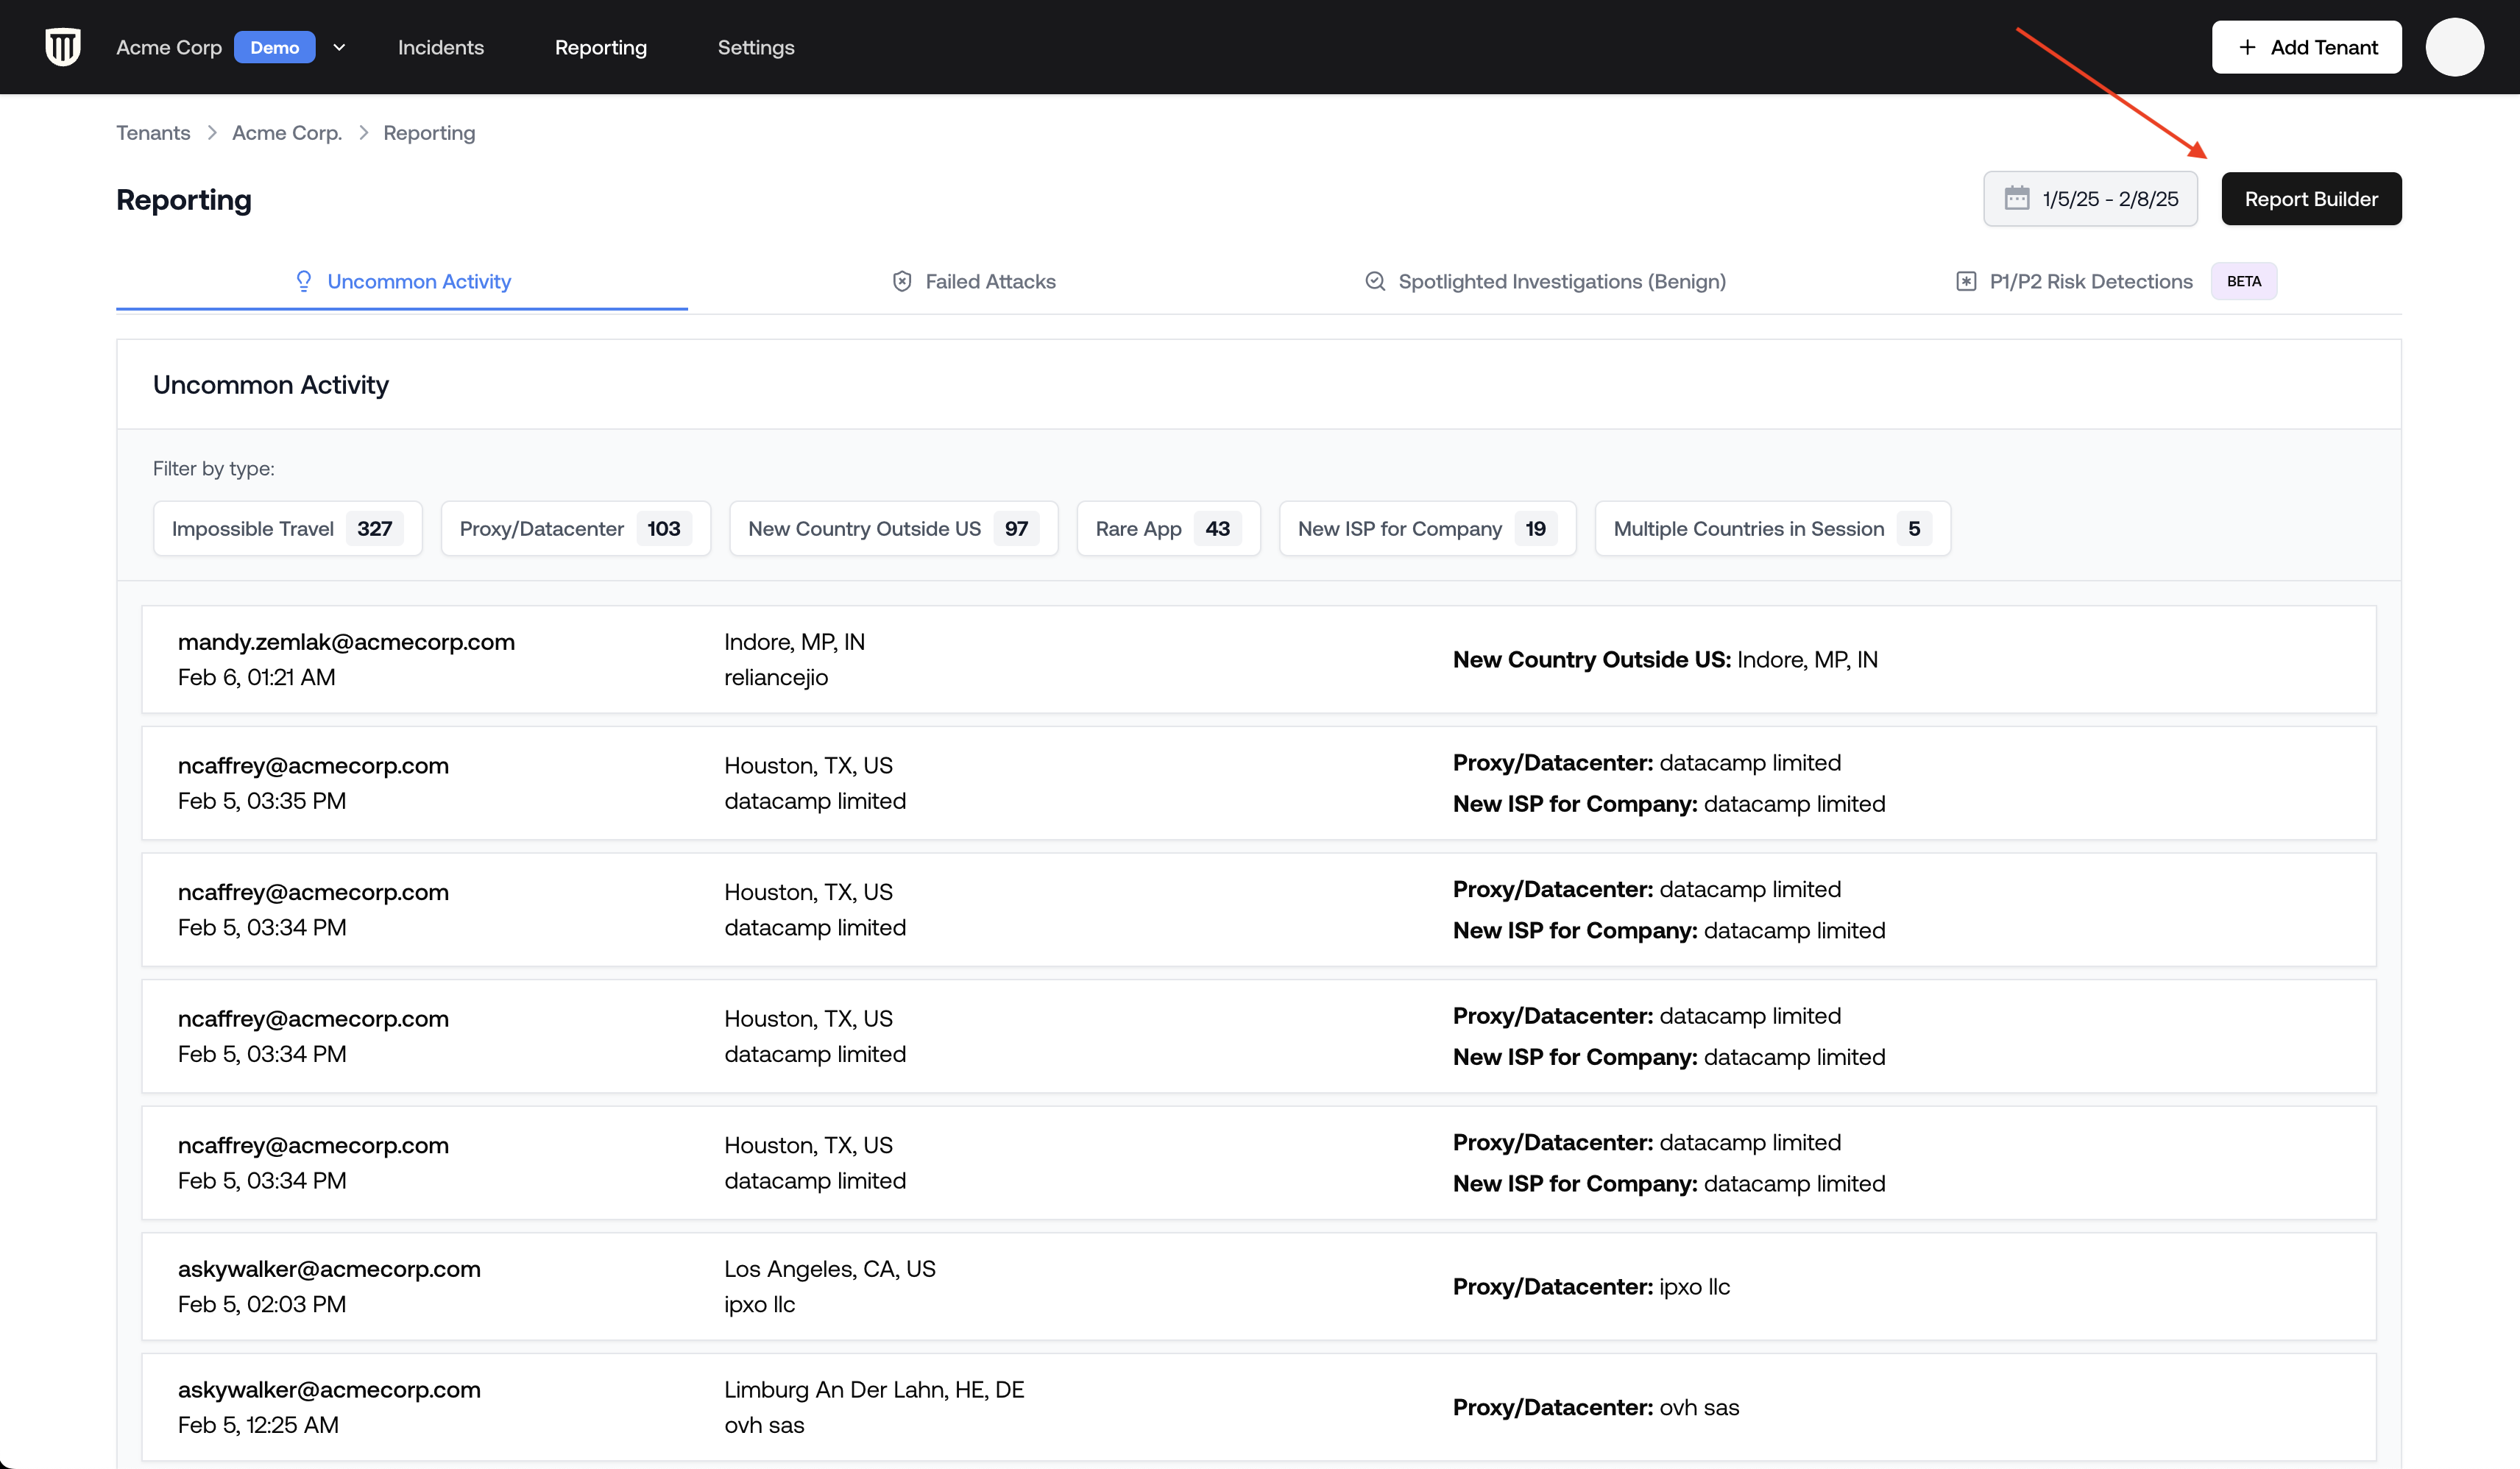
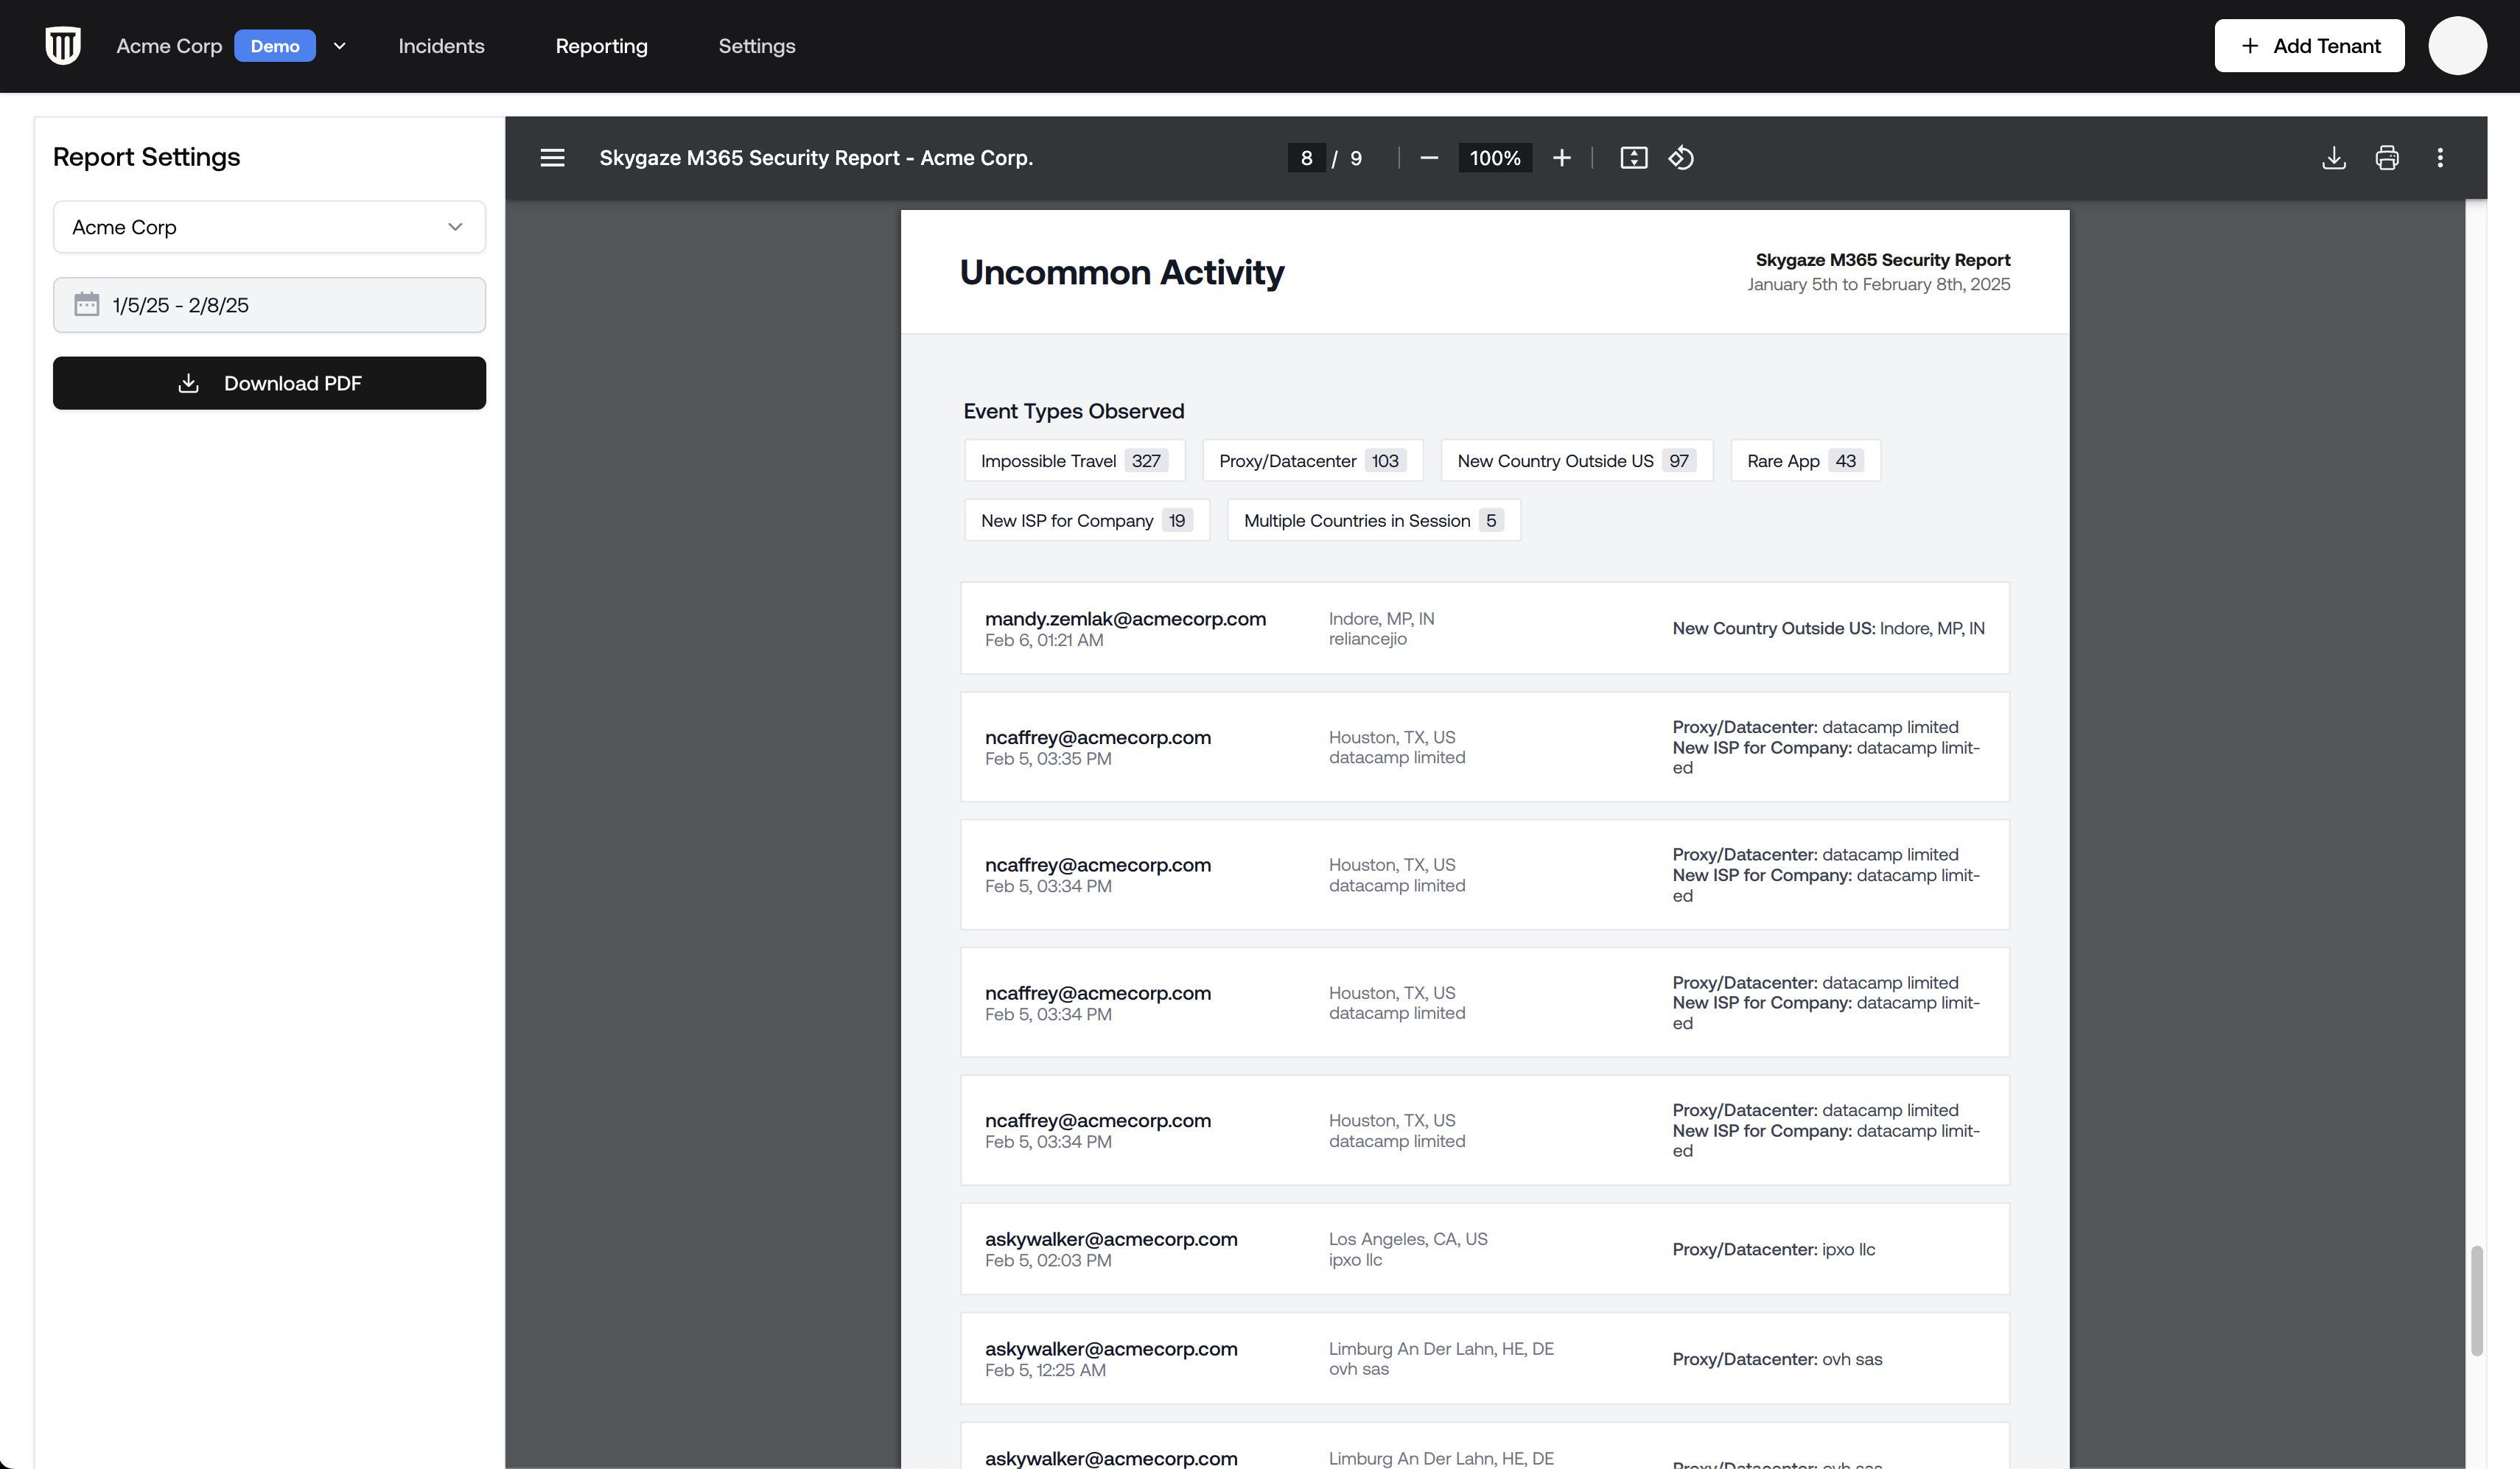
- Uncommon Activity: Anomalous activities that indicate unusual behavior but are not incidents. These make great talking points or launchpads for hardening initiatives.
- Spotlighted Investigations: Detailed analyses conducted by the Petra security team.
- Incidents: Any incidents that occurred during the report period. Full incident reports are included in the appendix.
- Investigated Activity (optional): Unusual login patterns and detection types that were investigated. See Configuring Report Content.
Downloading a Report
- Within the Report Builder, select the tenant and date range.
- Click Download PDF.
- The PDF includes your organization’s logo, name, contact email, tenant information, and the selected date range.
Configuring Report Content
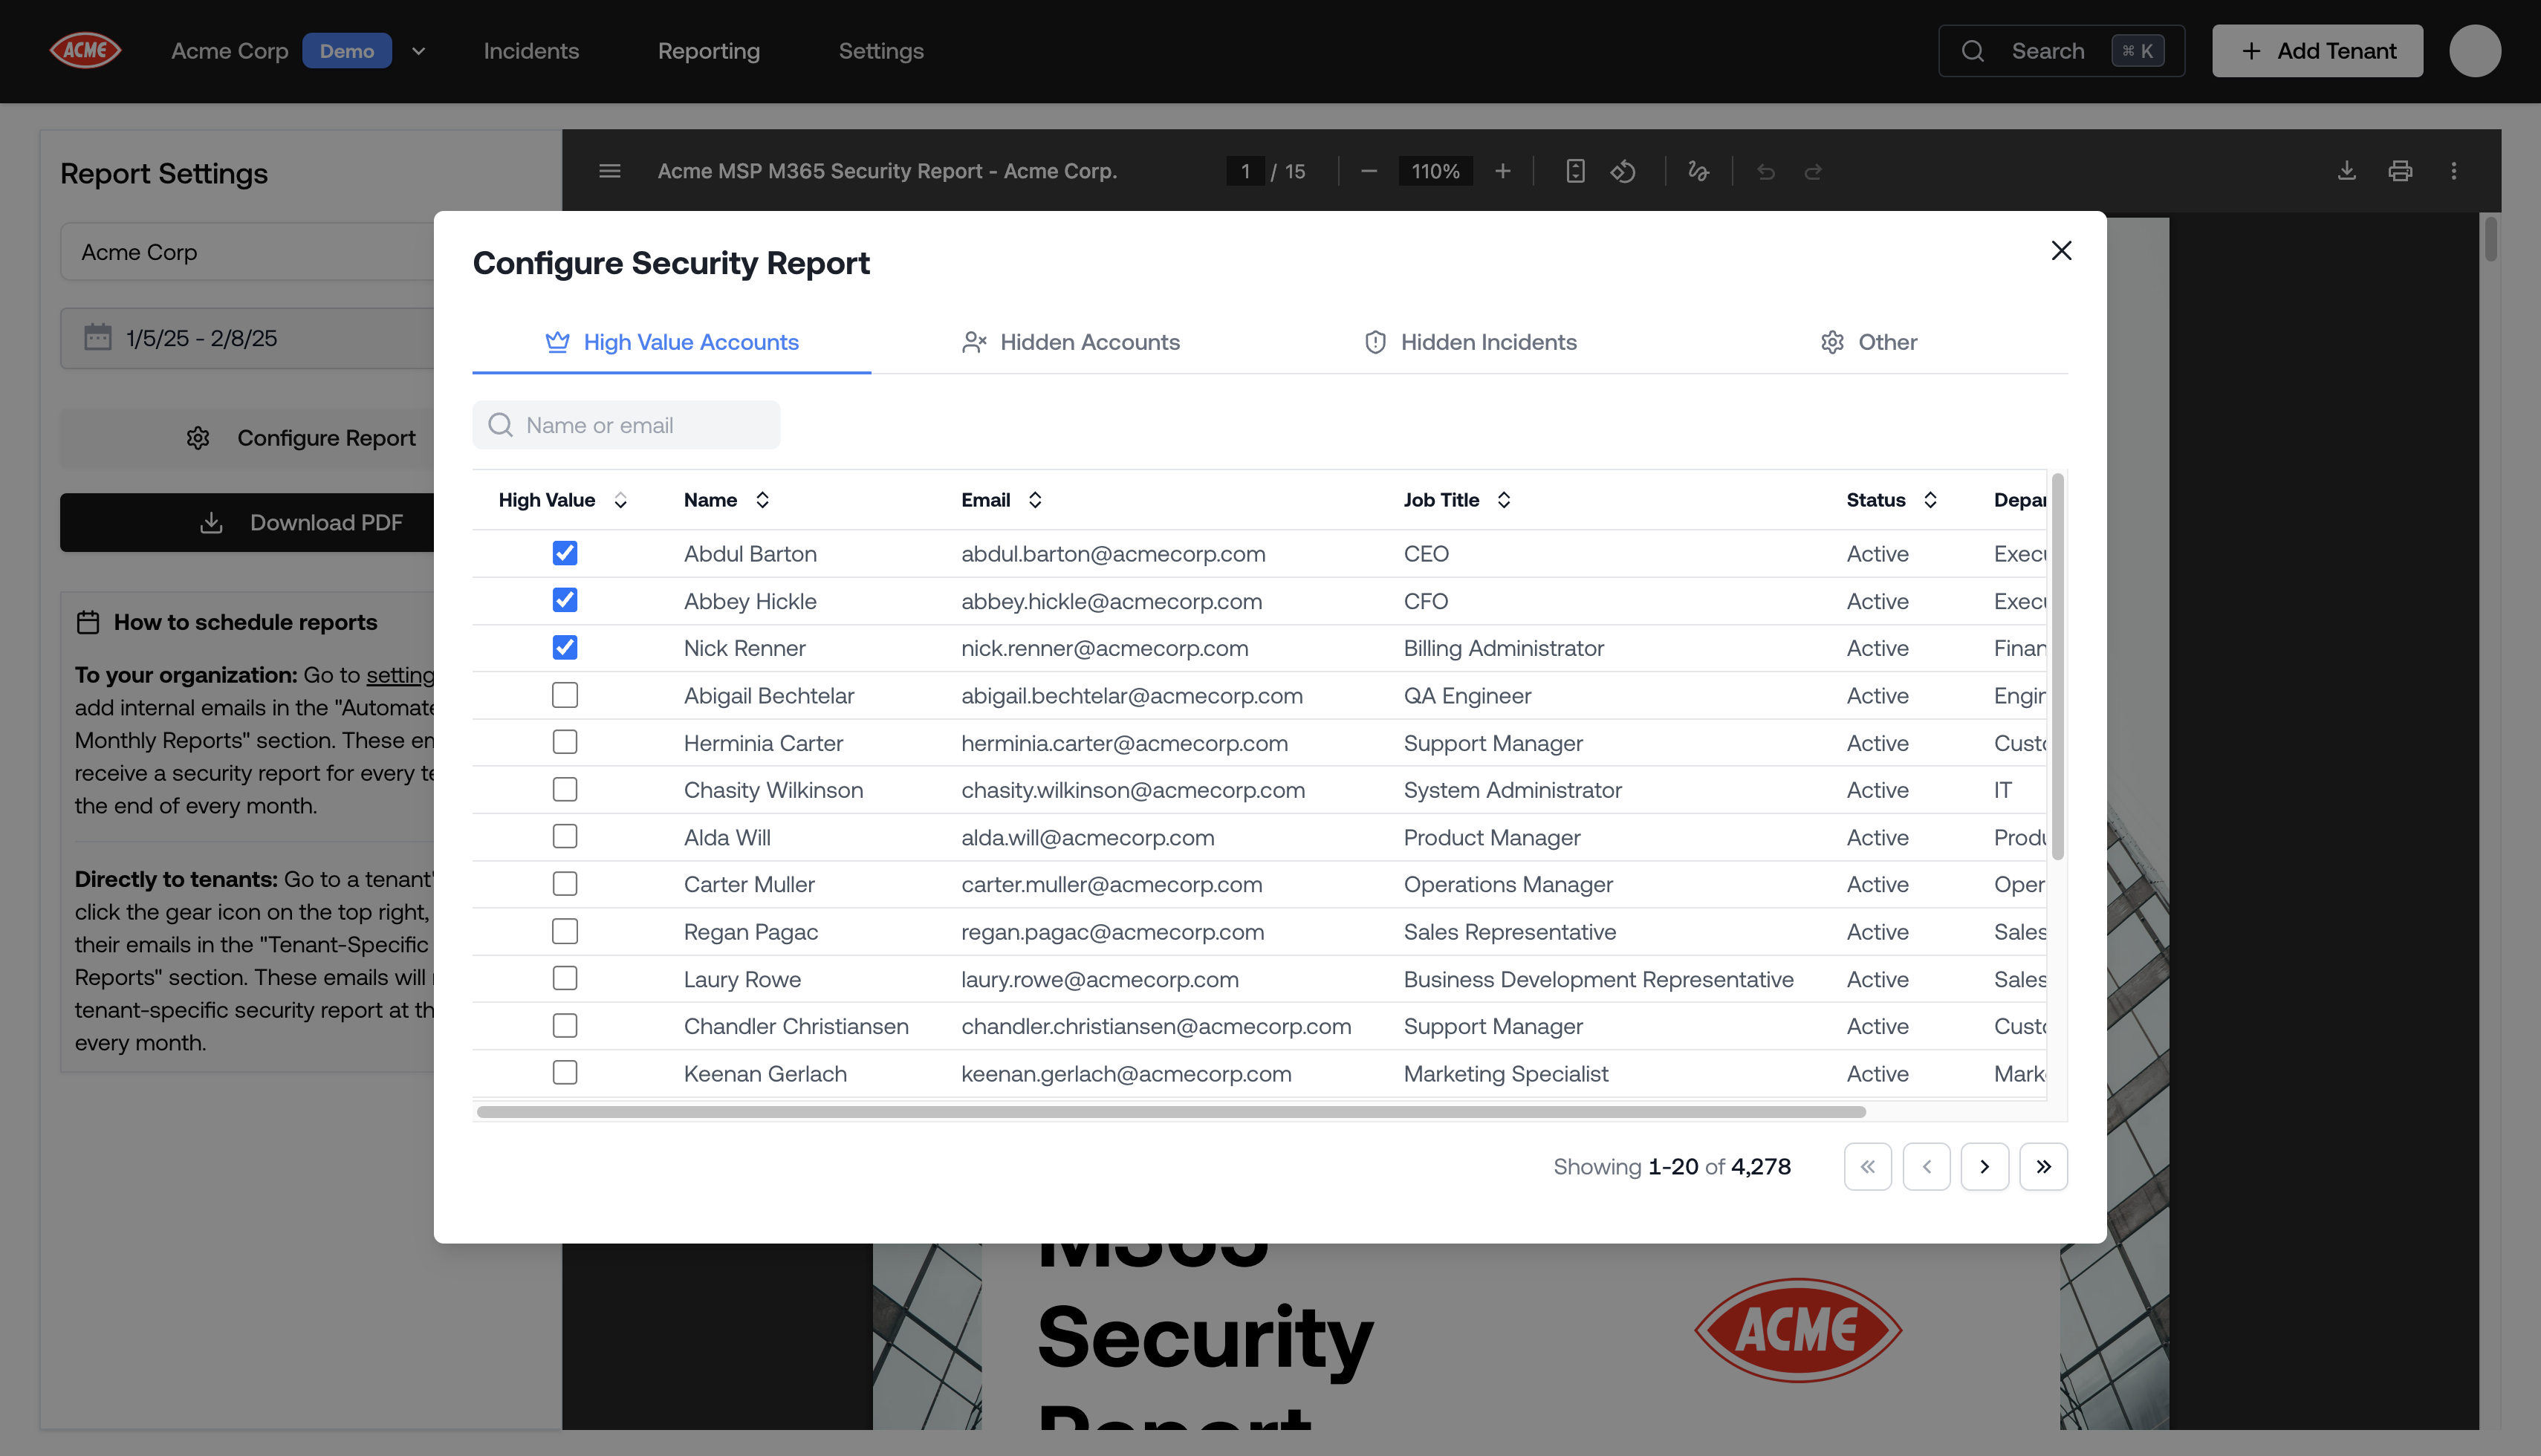
Click Configure Report in the Report Builder to open the configuration modal. This lets you fine-tune exactly what appears in the generated PDF.
High Value Accounts
Tag accounts like CEO, CFO, or billing managers as high value. High value accounts receive greater detail in the report, making it easy to show your client that their most important people are being watched.
- Open the High Value Accounts tab in the configuration modal.
- Search for a user by name or email.
- Check the High Value checkbox next to the account.
Hidden Accounts
Hide accounts that should be excluded from the report entirely, such as your own admin account or testing accounts.
- Open the Hidden Accounts tab.
- Search for a user by name or email.
- Check the checkbox to omit the account from reports.
Hidden Incidents
Hide specific incidents from the report, such as ones you have already surfaced to the client or that are not relevant.
- Open the Hidden Incidents tab.
- Check the checkbox next to any incident to exclude it.
Other Settings
The Other tab includes:
- Investigated Activity: Toggle whether the investigated activity section appears in reports, and select which detection types to include (Impossible Travel, New Country, New ASN, Proxy Datacenter, Rare App, Rare OS, and more).
- Branding shortcut: A link to Settings → Branding where you can configure your logo and contact email (see Customizing Report Branding below).
Scheduling Automated Monthly Reports
Petra can automatically send tenant security reports at the end of every month. There are two ways to set this up depending on who should receive them.
Sending Reports to Your Organization
Add internal email addresses that should receive a security report for every tenant at the end of every month.
- Go to Settings > Notifications.
- Under Automated Monthly Reports (Internal emails only), add email addresses.
These recipients receive a ZIP file containing a PDF report for each tenant. Reports are sent from reports@petrasecurity.com.
These emails will receive security reports for all of your tenants. Only add emails within your organization.
Sending Reports Directly to Tenants
Add tenant-specific email addresses so your clients receive their own security report each month.
- Navigate to the tenant’s page by clicking on the tenant from the Homepage.
- Click the Settings (gear) icon to open the tenant settings modal.
- Under Tenant-Specific Monthly Reports, add the client’s email address.
These recipients receive a PDF report for that specific tenant only. Reports are sent from reports@petrasecurity.com.
Monthly reports are a great way to demonstrate ongoing value to your clients. If you manage tenants on behalf of clients, see Co-Managed Tenants for how to give clients direct portal access alongside automated reports. Downloading Previously Generated Reports
Every automated monthly report that Petra has generated is available for download in the Reporting tab under the Automated Reports sub-tab. Reports are stored as ZIP files, each containing a PDF for every tenant included in that month’s run.
- Navigate to the Reporting tab in the top navigation bar.
- Click the Automated Reports tab.
- Under Security Report Artifacts, find the report you want by date.
- Click Download to get the ZIP file.
If you received a monthly report email with a download link, clicking it will take you directly to this tab and begin the download automatically.
Customizing Report Branding
Tenant reports are white-labeled with your organization’s branding. You can customize the logo, organization name, contact email, and currency that appear in every generated PDF.
How to Update Branding
- Navigate to Settings → Branding.
- Update any of the fields described below. Changes are saved automatically.
You can also reach the Branding page from the Report Builder by clicking Configure Report → Other → Configure logo and contact email.
Branding Options
| Field | Description |
|---|
| Organization Name | Displayed in report headers and titles. |
| PDF Export Contact Email | Shown in generated PDFs so tenants can contact you with questions. Also used as the reply-to address for automated monthly report emails. |
| Reporting Timezone | The timezone used for all dates and timestamps in generated PDF reports. Dates and times in reports will be displayed according to this timezone setting. |
| Report Currency | The currency symbol used for monetary figures in PDF reports (for example, the “Why M365 protection matters” statistics). Supported values: $ (default), £, €, A$, C$, and NZ$. Amounts are adjusted for local purchasing power rather than raw exchange rates. |
| Navigation Bar Logo | Your logo in the Petra app’s navigation bar. Used as a fallback in PDFs if no PDF Export Logo is set. |
| PDF Export Logo | A dedicated logo for all PDF reports (tenant reports, threat remediation reports). If not set, the Navigation Bar Logo is used instead. |
Logo Requirements
- Supported formats: JPEG, PNG, SVG, WebP
- Max file size: 2 MB for the Navigation Bar Logo, 5 MB for the PDF Export Logo
- Recommended: Use a high-resolution, square image for the PDF Export Logo so it renders clearly in reports
- Upload methods: Click the upload area, drag and drop a file, or paste an image from your clipboard